Wireless Keyboard?
The dream was simple, a normal split wireless keyboard: better posture, no wires, clean desk. How hard is that supposed to be.
Okay, yeah sure i had a checklist of things to make it perfect. But that’s besides the point. The whole mechanical keyboard community should have a least solved this problem by now. But i guess now. So leave it to me to make some jank garbage, in attempt to create this “Dream Keyboard”
This is a build guide, but it’s mostly my journey into the depths of the keyboard world.
Notes
- Bottom of the page has all the links throughout this adventure
- Github repo for this github.io has more resources like pictures and the code - https://github.com/dinopanda/dinopanda.github.io
- The github rendering works better sometimes - https://github.com/dinopanda/dinopanda.github.io/edit/master/wirelesskeyboard.md
Research
A quick google search of “wireless split keyboard” does not in fact lead to the dream but a bunch of lame big company ergo keyboards that are wireless. lame.
“wireless split keyboard reddit” on the other hand does direct us to one of the best designed keyboards and well documented build process, the Mitosis keyboard https://www.reddit.com/r/MechanicalKeyboards/comments/66588f/wireless_split_qmk_mitosis/. This keyboard is A++ design of reusability of PCBs and A+ documentation. But, didn’t fit my dreams of a “normal” keyboard. The custom bluetooth receiver though is a bit much. Wonderfully designed and done, but too much for me. The search continues…
Googling and asking friends came upon this normal looking split keyboard from Keebio https://keeb.io/products/quefrency-60-65-split-staggered-keyboard. Clearly we have standard keybard split by the left and right now sides (looks good so far), but is not wireless… Why do we even have wires in this day and age?
Research Research
So with my mind decided on the Quefrency keyboard and do note that there are plans for a new version with back lighting, i decided to research what it would take to make a normal designed PCB into two wireless halves.
This starts from their own build guide https://docs.keeb.io/quefrency-build-guide/. This build guide is the basis of what i build on, obviously since i use their PCB i can only deviate so much.
-
Knowledge #1 - ATmega32U4 - the usage of Pro Mircos is very common https://keeb.io/products/pro-micro-5v-16mhz-arduino-compatible-atmega32u4. When i was looking around all usb-c versions were sold out, now many version are around and even mid mount designs which are slim and nice. Though because they seem to be new ish they seem to have their own sets of problems: https://keeb.io/products/elite-c-usb-c-pro-micro-replacement-arduino-compatible-atmega32u4, https://keeb.io/products/elite-c-low-profile-version-usb-c-pro-micro-replacement-atmega32u4. And of course you don’t have to get them through Keebio many people make their own versions of them, it’s just easier to get them all together. But the true knowledge here is the processor used, ATmega32U4.
-
Knowledge #2 - QMK - i’ve researched this far, yet i still don’t know what this mysterious QMK acronym is, maybe that should be next to look in to. And presto google and done QMK (Quantum Mechanical Keyboard Firmware) https://docs.qmk.fm/#/. Thank you google. Fantastic, code to edit before flashing these ATmega32u4 (note i did not say pro micros).
-
Knowledge #3 - Bluetooth (nRF51822) - QMK with the power of community anything is possible. Bluetooth is already supported and with a couple options as well, https://docs.qmk.fm/#/feature_bluetooth. Their links led me to the Adafruit company, down to a search and found out about a product line called Feather. They have a product with the nRF51822 bluetooth chip as well as the ATmega32U4 processor, https://www.adafruit.com/product/2829.
Idea
The idea? Simple. Can i smash this different size dev board where a smaller dev board was designed to fit, to give it bluetooth capabilities? Answer. Yes.
Execution
The actual build part or maybe it’s just the part where i say i did the idea and done. Cause really that’s what happened.
Step 1 - Parts
First things first, what am i even smashing together.
- 1x - Left hand Board - this comes with the necessary diodes
- 1x - Right hand Board - this comes with the necessary diodes
- 1x - Left hand Case
- 1x - Right hand Case
- ~4 - Cherry MX Stabilizers (i ended up using 4, depending on your setup you might need more or less)
- 2x - Bluetooth Microcontrollers (Adafruit Feather 32u4 Bluefruit LE)
- 2x - 3.7v Li-Ion Poly batteries (Various sizes could work, found a 1200mAh that was thin and fit)
- 2x - Small switches
- Enough Solid Core Wire - 22AWG - Would recommend at least getting 2 colors (red and black) for power and ground
- Some extra standoffs for keyboard height
Various tools, soldering iron, multimeter, wire strippers, and wire cutters.
Links:
- Base keyboard parts all bought from Keebio - https://keeb.io/products/quefrency-60-65-split-staggered-keyboard
- Cherry MX Stabilizers - https://keeb.io/products/cherry-mx-stabilizer
- Bluetooth Microcontroller from Adafruit - https://www.adafruit.com/product/2829
- Li-Ion Poly Batteries - https://www.adafruit.com/product/258
- Small Switches - https://www.adafruit.com/product/805
- Solid Core Wire - https://www.adafruit.com/product/288
- Plastic standoffs - https://www.adafruit.com/product/3299
- Wire Strippers - https://www.adafruit.com/product/527
- Wire Cutters - https://www.adafruit.com/product/152
- Soldering iron - find something reasonable
- multimeter - any cheap one will work for keyboards
Step 2 - QMK
Problem: Adafruit Feather 32u4 (will be called Feather for the rest of this adventure) does not have the exact same layout as the Pro Mirco in the Quefrency guide.
Solution: Rebuild the the QMK firmware for the new physical pinout of the Feather to reduce the amount of wire crossing while soldering to board.
Thus research and testing is necessary.
QMK
Let’s get into this QMK business some more.
As in you should get familiar with their stuff.
Environment
Luckily the community is good and has documentation as we found out earlier. But what are we trying to do now? Custom keyboard layout and new pinouts. Hmm… Seems like more than i bargained for. But first, setup, we need the build environment to create whatever is going to be flashed onto the Feather.
Follow their guide to how to build to your liking: https://docs.qmk.fm/
As for me, i ended using the Bash on Windows setup with the QMK Toolbox: https://docs.qmk.fm/#/getting_started_build_tools?id=creators-update - https://github.com/qmk/qmk_toolbox/releases
I found the new Bash on Windows to be easy to install the toolchain and also path into native windows directory. The QMK Toolbox is easy as finding the built file and clicking a button.
Firmware
Luckily the Keebio people (or is it person?) are nice and have commited to the QMK code base and added their own everything, that works if you follow their build guide exactly and want their layouts: https://github.com/qmk/qmk_firmware/tree/master/keyboards/keebio/quefrency
This however is not what we want, but this means we have to do very “little” work to get this working. The TLDR is that i came up with this new pinout for the Feather. This piece of code is found in the config.h file (this config.h would be under something like rev1/config.h).
#define MATRIX_ROW_PINS { F7, B7, B5, D7, C6, D0 }
#define MATRIX_COL_PINS { F6, F5, F4, F1, F0, D2, D3, B6 }
#define MATRIX_ROW_PINS_RIGHT { F7, B7, B5, D7, C6, D0 }
#define MATRIX_COL_PINS_RIGHT { F6, F5, F4, F1, F0, D2, D3, B6 }
You can also edit product name and such in this file for example #define PRODUCT SAUR. So if you’re like me you can name your left hand side DINO and the right hand side SAUR. Just for fun.
To get to this point was relatively easy, just a painful process of remapping from one board to another. Really i could have done less work but i didn’t know what i was doing it, so it was extra long and painful.
Really just by looking at the Feather pinout diagram they provided, https://learn.adafruit.com/adafruit-feather-32u4-bluefruit-le/pinouts, i was able to map that to the pinouts defined in the code for the inteded Pro Micro controller. I just had to make sure on the Feather i didn’t use any ports that were used by the bluetooth module: aka PB1 (SCK), PB2 (MOSI), PB3 (MISO). Mapping this way would not physically twist the wires, which was the only goal.
Quefrency did intend the D0 pinout to be the SOFT_SERIAL_PIN for the split keyboard (one way to tell which half is left vs right), but since they are wireless (going to show up as individual keyboards) this pin is useless really and i ended up mapping it to something i wasn’t using, D1.
Important Firmware things
Just because documentation is great, doesn’t prevent users from being stupid.
First of all to enable bluetooth from QMK, the rules.mk makefile must be edited to suport that, as per https://docs.qmk.fm/#/feature_bluetooth?id=bluetooth-rulesmk-options. And As per the table above in the documentation we will be using BLUETOOTH = AdafruitBLE. This also means you should probably comment/remove BLUETOOTH_ENABLE = no, or experience who knows what.
Next, is a point of confusing, destruction, confusion, and sadness. There was a point where the F_CPU macro was defined in the rules.mk file. This is no longer true in the newest QMK repo, https://github.com/qmk/qmk_firmware/commit/2ee961c9e873d577e711431ae0960aa21629525e#diff-424e469cfd48af9d144fe061f2394117. If we do happen though to take a look at this file when i used it, https://github.com/qmk/qmk_firmware/blob/b2ee290c9f506e42dd9c4577c8147646c405aeb0/keyboards/keebio/quefrency/rules.mk, we do see the F_CPU to bet set at 16000000. This is the frequency an ATmega32U4 can run at. Which is good, our Feather uses the atmega32u4. Unfortunately, names are not the truth. The Feather as clearly printed on the back of it’s board is clocked at 8Mhz. I’m assuming this has to do with the bluethooth module.
Now, this might seem fine, given the comments about this being “Note that this value does not change the processor frequency - it should merely be updated to reflect the processor speed set externally so that the code can use accurate software delays”. But descrution and sadness was present when using 16MHz, it seems that this somehow affect my bluetooth module and the associated led lights that the Feather had. The board became unusable, the leds never turned on again, and was tossed. Sad.
Therefore, you should not do this and set F_CPU to 8000000. Or not. The new code does not even seem to reference the clock rate, but i’m assuming it’s because it’s hidden somewhere else behind that new fancy pants bootloader selection.
Just letting you know
Build
To build this firmware, i decided to do the lazy route. Since these bluetooth modules can not act as receivers, they will just both be views as stand alone keyboards just missing their butter half.
The QMK Docs again came in handy and found out how to easily do this: https://docs.qmk.fm/#/feature_split_keyboard?id=handedness-by-define. Simply add the #define MASTER_LEFT or #define MASTER_RIGHT in the same config.h file.
This means all we have to do to get working firmware now is build 2 separate versions, one with the #define MASTER_LEFT and one with #define MASTER_RIGHT and flash the left and right Feather with the appropriate build.
Flash
Use the QMK Toolbox tool, https://github.com/qmk/qmk_toolbox/releases, to flash, you can figure it out.
Testing
There are ways to test the flashed Feather, before soldering it on.
Of course you should be able to connect to it with bluetooth. If not, well, good luck and try again.
For testing the keyboard part, uust use a wire and connect a column to a row pin and see if the expected letter is printed on the screen.
Step 3 - Smash it together
It’s simple just toss it all together.
Really though, just follow the Keebio Quefrency build guide here - https://docs.keeb.io/quefrency-build-guide/. Ignore some of the extra parts not needed like the 2 TRRS Jacks and the TRRS cable, since those parts are used for the split awareness.
All you have to do is use tiny wires to “expand” the Pro Micro footprint to the Feather footprint and with “careful” soldering, it will be in place. I also tore out the battery JST jack, also “carefully”, to attach the switch and move the battery positioning.
As a tip, you should try to put all items, towards the back of the keyboard. Since these parts can get thick, you can get away with some of the thickness by making it slope down and not cause your wrists pain.
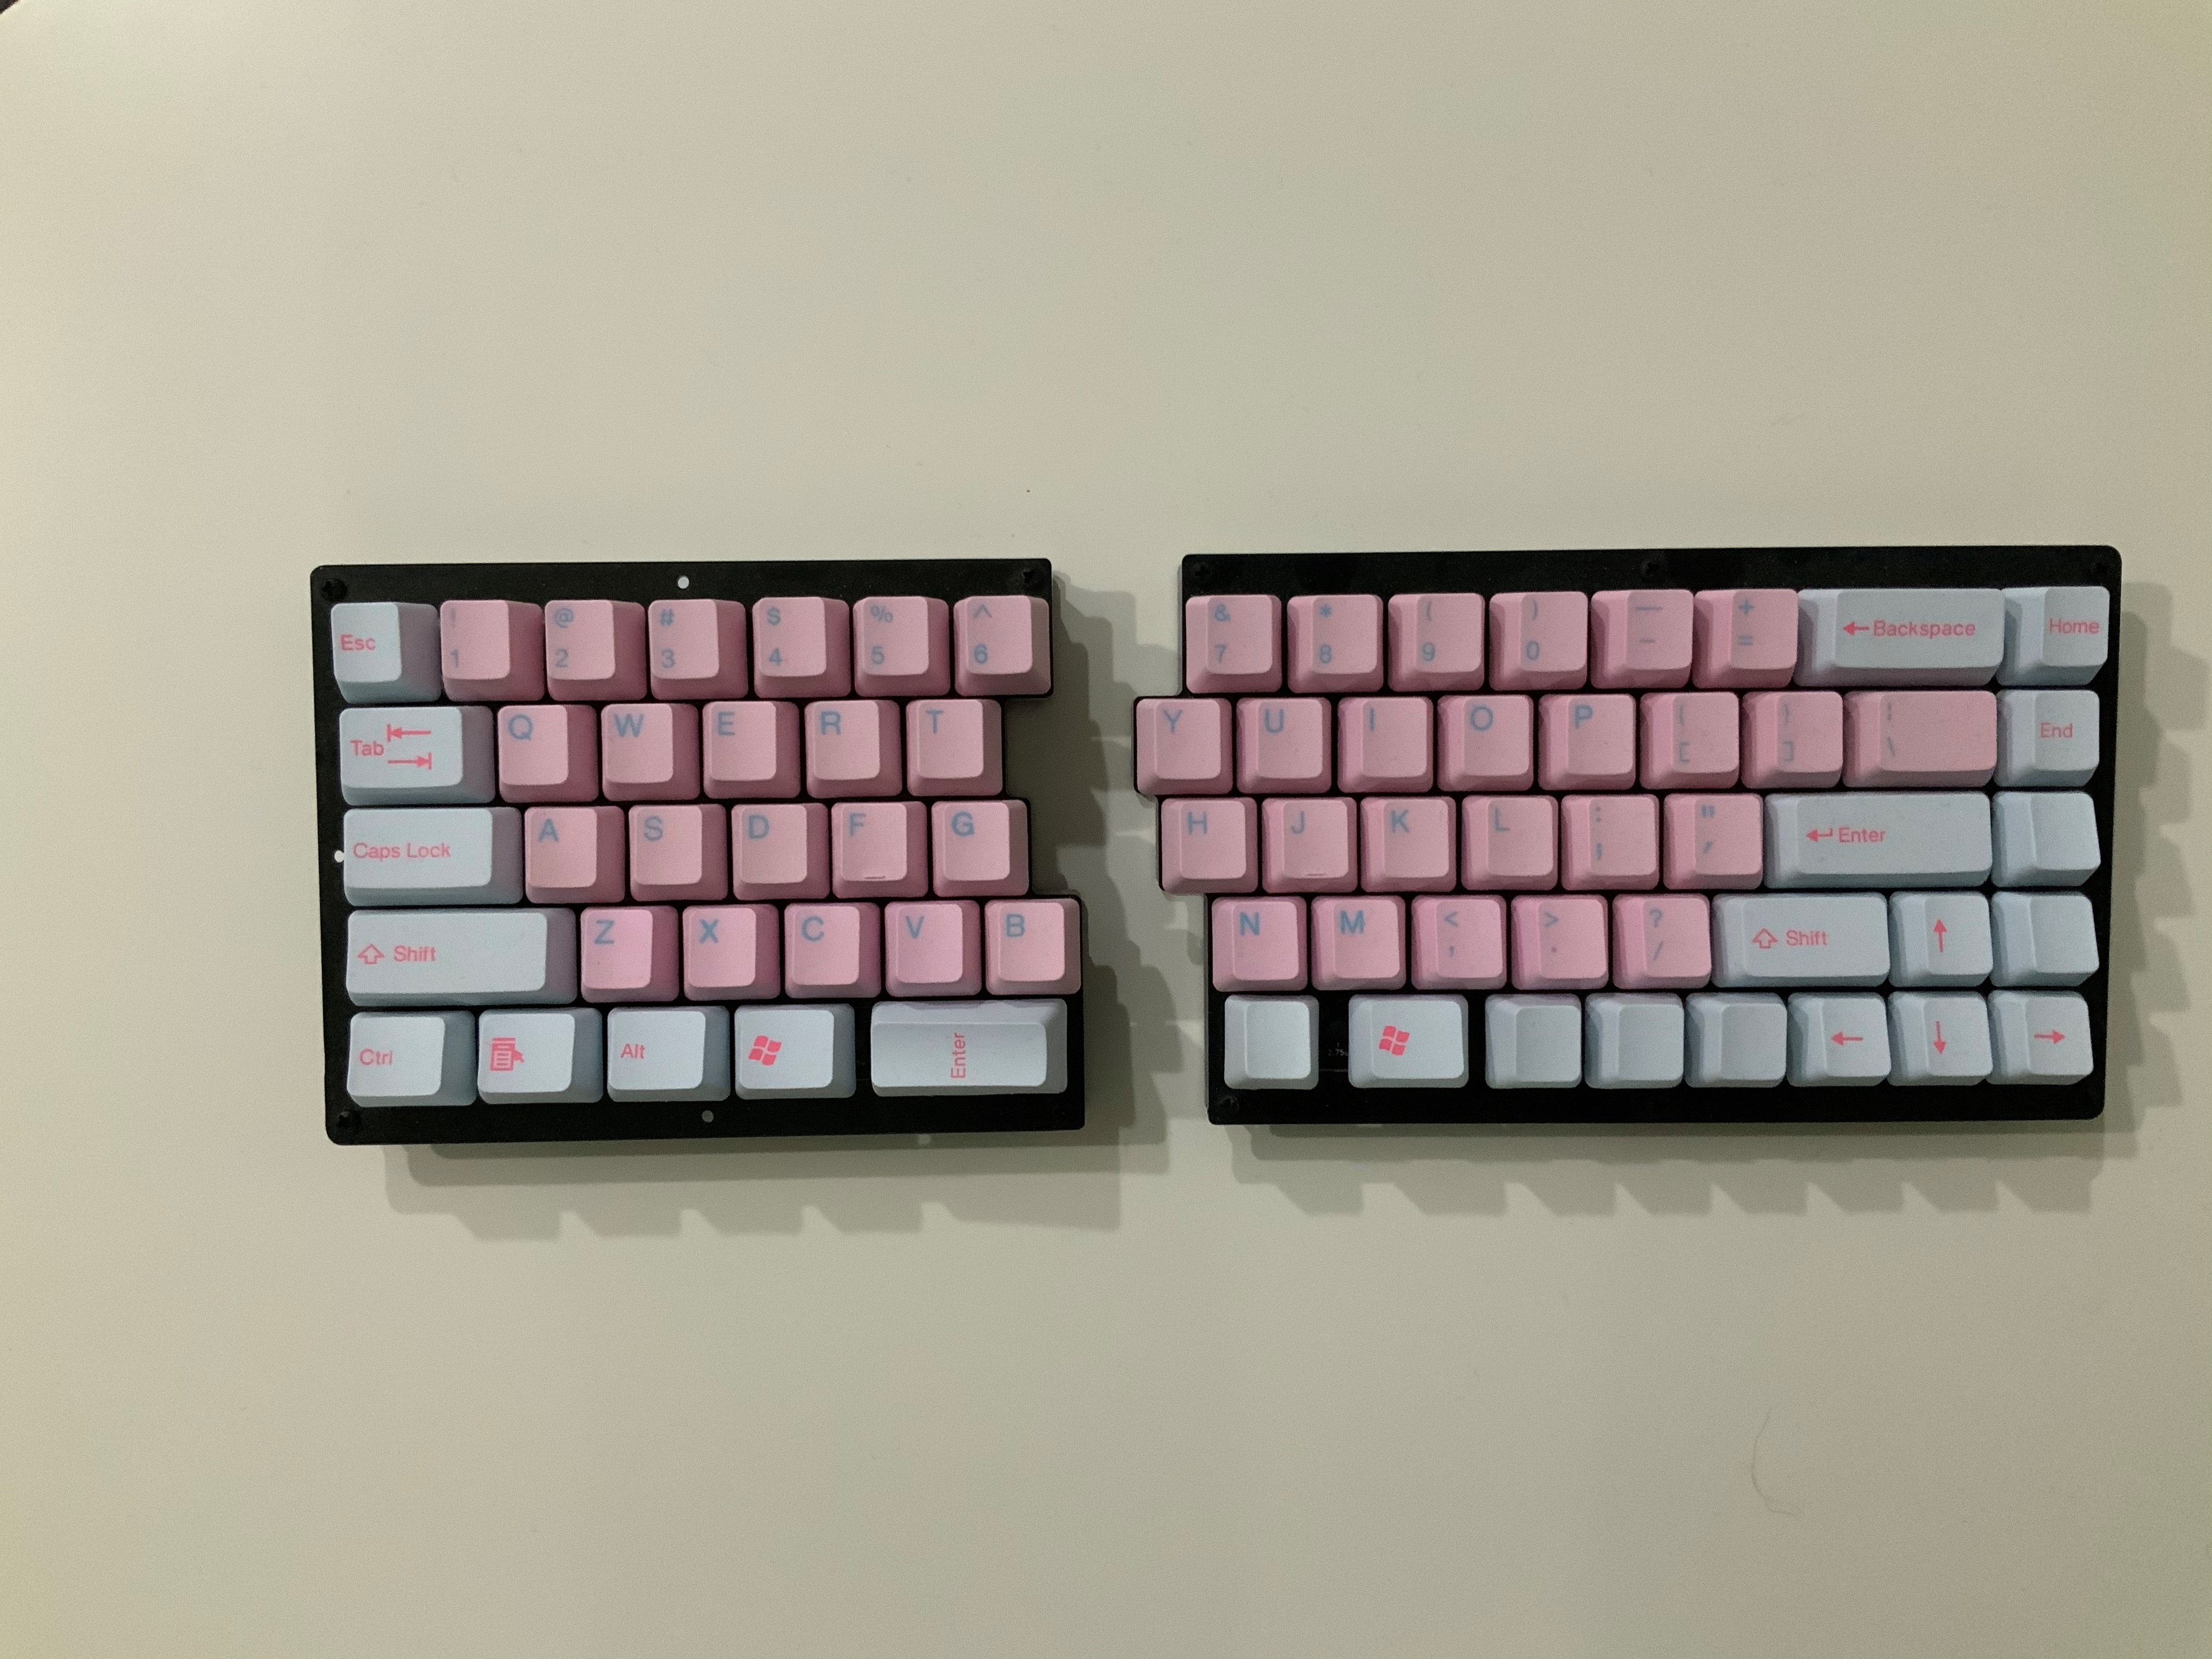
Done
Well wasn’t that easy.
Just like that dreams are made
All the Goodies
QMK
- QMK Github - https://github.com/qmk/qmk_firmware
- QMK Docs - https://docs.qmk.fm/
- QMK Toolbox - https://github.com/qmk/qmk_toolbox/releases
- QMK Environment Docs - https://docs.qmk.fm/#/getting_started_build_tools?id=creators-update
- QMK Bluetooth Docs - https://docs.qmk.fm/#/feature_bluetooth
- QMK Split Docs - https://docs.qmk.fm/#/feature_split_keyboard
- QMK Github for Quefrency - https://github.com/qmk/qmk_firmware/tree/master/keyboards/keebio/quefrency
- QMK Github for Quefrency old rules.mk - https://github.com/qmk/qmk_firmware/blob/b2ee290c9f506e42dd9c4577c8147646c405aeb0/keyboards/keebio/quefrency/rules.mk
Keebio
- Quefrency - https://keeb.io/products/quefrency-60-65-split-staggered-keyboard
- Quefrency build guide - https://docs.keeb.io/quefrency-build-guide/
- Cherry MX Stabilizers - https://keeb.io/products/cherry-mx-stabilizer
- Pro Mirco Micro USB - https://keeb.io/products/pro-micro-5v-16mhz-arduino-compatible-atmega32u4
- Pro Mirco USB C - https://keeb.io/products/elite-c-usb-c-pro-micro-replacement-arduino-compatible-atmega32u4
- Pro Mirco USB C Low Profile - https://keeb.io/products/elite-c-low-profile-version-usb-c-pro-micro-replacement-atmega32u4
Adafruit
- Adafruit Feather 32u4 Pinout - https://learn.adafruit.com/adafruit-feather-32u4-bluefruit-le/pinouts
- Bluetooth Microcontroller from Adafruit - https://www.adafruit.com/product/2829
- Li-Ion Poly Batteries - https://www.adafruit.com/product/258
- Small Switches - https://www.adafruit.com/product/805
- Solid Core Wire - https://www.adafruit.com/product/288
- Plastic standoffs - https://www.adafruit.com/product/3299
- Wire Strippers - https://www.adafruit.com/product/527
- Wire Cutters - https://www.adafruit.com/product/152
Mitosis
- Mitosis keyboard - https://www.reddit.com/r/MechanicalKeyboards/comments/66588f/wireless_split_qmk_mitosis/
Extras
- Keyboard Layout Generator - https://config.qmk.fm/#/
- Keyboard Plate Designer - http://builder.swillkb.com/